Do-It-Yourself RV Window Installation Guide
Installing a window in your RV is easier than you might think. First timers should plan on 1-2 hours to complete a window installation. To make this as easy as possible, we have provided step-by-step instructions for this Do-it-yourself project. If you have not yet ordered a new window, our "Do-It-Yourself Measuring Guide" can help you correctly measure and order a window to fit most RVs on the road today. You may also download this installation guide as a PDF file.
Tools needed. Your new window is shipped with all the parts you need for a complete installation: Window and Frame, Interior Trim Ring, Screws and Flange Seal Tape. The only tools you will need are a Screw Gun and Putty Knife.
Step 1. Prepare the window opening.
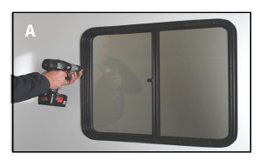
- If you are installing a replacement window you will begin by removing the old window. To do this, remove all the screws around the perimeter of the window frame (inside the vehicle). There will be approximately 12-20+ screws depending on the size of the window. (See photo A)
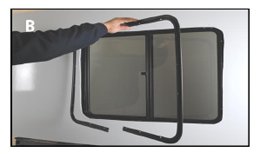
- Once all screws are removed, the window can be pushed out of its opening. It is recommended that a second person stand outside with a hand lightly on the window to prevent the window from falling to the ground. (See photo B)
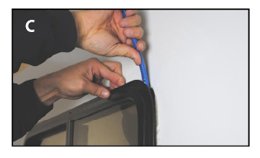
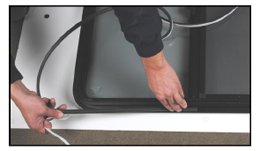
- If the window is still firmly in place after all screws are removed, you can break the seal by sliding a thin putty knife under the exterior window flange and working your way around the window until loose. Be careful not to damage any paint or graphics that are on your vehicle sidewall. (See photo C)
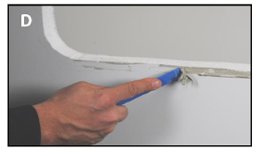
- Once the old window is successfully removed, carefully remove any remaining sealant or tape that is stuck to the outside wall at the window opening. (See photo D)
Step 2. Verify window fit.
- Test fit the new window by simply placing it in the rough opening to ensure a proper fit. (Do not put the seal tape on the window at this point)
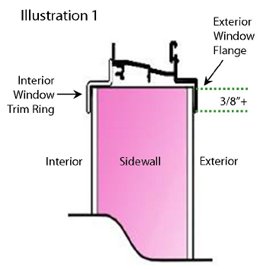
- The exterior window flange should overlap the opening by 3/8" or more to provide a good seal to the sidewall. A small gap on the inside between 1/8"-1/4" is expected and will be covered by the trim ring when the installation is complete. (See Illustration 1)
Step 3. Prepare and Install the new window.
- Lay the new window face down on a soft surface so not to scratch it, and apply the bulb seal tape (included with the new window) around the flange. Start in the center of the bottom side of the window and apply the seal tape all the way around the perimeter until the ends meet, and trim flush (Note: There should not be a gap where the seal ends meet).
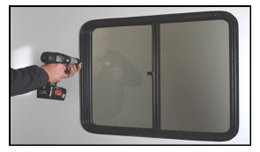
- Place the window into the opening from outside the vehicle, while a second person aligns the trim ring on the inside of the window. Begin fastening the trim ring with the provided screws, starting with the 4 corners first. Work your way around the perimeter gradually tightening each screw as you go. This will slowly pull the trim ring and window together. (Note: Use only the screws provided with the new window, as longer screws could damage the window frame).
- It is recommend that you cap seal, or run a fine bead of caulk around the exterior perimeter of the window to provide an additional barrier to the elements.
Step 4. Enjoy your new windows.
- Now that your new window is properly secured and sealed you are ready to get back out on the road.
If you have any questions about the installation process, please feel free to contact us via phone at 800-551-9149 or email at
DuncanSales@lci1.com and one of our trained staff members can help answer your installation questions.
Disclaimer: It is the consumers responsibility to ensure the accuracy of the window
measurements submitted for order as well as proper installation. We assume no
responsibility for any incorrect measurements or installation errors made by the consumer.